Intro - Watch This First!
New Product
at the Elementary School Level
TWO WAYS to get your content!
Click the PDF link above under “Downloads” and get the Complete Guide downloaded to your device,
or use the “Tab System” below as a quick reference to your content.
CLICK TO DOWNLOAD YOUR WORKOUT JOURNAL
and track your progress!
Disclaimer
You must get your physician’s approval before beginning this exercise program.
These recommendations are not medical guidelines but are for education purposes only. You must consult your physician prior to starting this program or if you have any medical condition or injury that contraindicates physical activity. This program is designed for healthy athletes who have passed all physicals related to sports and activities.
The information in this report is meant to supplement, not replace, proper exercise training. All forms of exercise and training programs pose some inherent risks. The author, editor and publisher recommend that all readers who embark on this program know their physical limitations. Before practicing the exercises and program in this book, be sure your equipment is properly secured, maintained and in working order.
Don’t lift heavy weights if you are alone, without sufficient spotting, inexperienced, tired or injured. Be sure to learn proper form on all exercises with the support of a qualified trainer or coach. Always ask for instruction and assistance when lifting. Always warm up prior to each workout and each exercise within your workout.
Consult your physician before starting any exercise or nutrition program. If you are taking any medications, you must consult your physician prior to beginning any exercise program, including any of the workouts in the Workouts for Wrestlers program. If you experience dizziness, shortness of breath, or lightheadedness stop exercising immediately, and consult a physician.
10 Rules of Strength Training for Athletes
- Don’t ever perform an exercise unless you are properly instructed on how to do it first. Start light and develop a healthy movement pattern before adding weight.
- Don’t ever perform an exercise that hurts. Listen to your body. Some exercises work for some people but not for others. There are always alternative exercises for each of my programs. If you need a substitution, just email me at support@youthathlete.com.
- If in doubt, go light. You can’t force growth and strength. The first week of any program is meant to give you a neuromuscular connection. Go through the motions with lighter weight, than work up in weight accordingly.
- If you feel sore, tired or burnt out, take an extra day or two of rest. The key is to prevent overtraining from occurring. You only have so much energy in your tank, and you can’t use it up and still expect to get stronger. Moderation is best.
- Use a spotter for heavy training. Never perform a Squat or Press of any kind without proper spotting.
- Always seek to engage your core when training. “Thinking” about using your abs when performing strength training and speed training drills will actually help you get them stronger and help you perform better as an athlete.
- Don’t over-aerobicize. In other words, don’t do more cardio than strength training, or you will lose muscle.
- Never skip a warm-up. Your muscles need to loosen up prior to each exercise within a workout or before wrestling.
- Change up your training after 4 weeks. You will get stronger, plus you’ll avoid the nagging injuries (such as tendonitis) that occur by doing the same thing repetitiously.
- Be sure you’re cleared to train by a doctor before starting any exercise or nutrition program.
How To Train Elementary and Middle School Athletes
Elementary and Middle School age athletes generally fall into the 6-13 year old age range. This time in their lives has similarities regarding growth and maturity. For that reason, I’ve included the same information in both the Elementary and Middle School Training Manuals EXCEPT the strength training part. The actual strength training exercises and programming for the Elementary School age athlete and the Middle School age athlete will be different.
Athletes between the ages of 6 and 13 have bodies that are like sponges and ‘soak up’ everything in terms of coordination development. A coach teaches young athletes the skills needed for their respective sport and has them practice the skills until they can execute the skills with fluidity through practice and repetition.
It is really important to give focus to overall ‘coordination development’ in athletes 6-13 while teaching sports skills. Athletes who are young can be developed into better athletes that will perform better in the long run by continuously addressing ‘coordination training’ in practice.
I’ll get into the specifics of strength training young athletes in a moment but I feel the need to stress adding in the following things within sports practice:
Bilateral Training – When working with athletes in the 6-13 age group you can use the technique of teaching non-dominance to enhance their ability to react, and effortlessly perform different moves by teaching ‘both sides. When teaching skills, be sure to have athletes work from both their ‘less-preferred’ leg along with their ‘preferred’ leg when kicking a ball. Have them practice throwing with their non-dominant hand. Have them learn to get used to moving with both sides of the body.
Do you see what I’m getting at?…
By teaching the younger athlete to use both sides of the body equally, you will instill a more firm neuromuscular connection that will transpire into better sports performances down the road. In the long run, this equates to more success.
Added Movements – Younger athletes can benefit greatly by adding a twist here and there when teaching the fundamental skills for sports. We can greatly serve the young athlete when we add skills that will help increase their self-awareness and body control.
Let me explain…
Instead of only having youth athletes run when practicing, include some unique added movements that make them think such as:
Start from one knee and then jump up and run
Jump up and perform a 360 degree spin then run
Perform a somersault then immediately run
Not only are these simple added movements fun for the younger athletes, but they are exceptional little tricks to employ to help your young athletes perfect the actual skill you seek (in this case, sprints). Be creative here. You can add movements when teaching any skills that you want the young athletes to concentrate on.
Conditioning for Youth Athletes
It certainly seems at times that younger wrestlers between ages 6-13 have endless energy, doesn’t it?
They can seemingly go from zero to 100 in no time flat and keep it up to the end of the match…
But many sports teams like to send their young athletes for long jogs to get them into condition for the season…
This is not only counter-productive, but it’s a sure path to burnout over the long haul. First, jogging elicits an aerobic energy requirement from your body. Most teams sports are anaerobic in nature. Therefore, jogging is severely overrated as a means to achieve ‘sport-specific’ conditioning for the requirements of a athletic performance.
It’s even worse to mindlessly send the youth athletes out for long jogs because of their phase of growth and development. Remember, when working with youth athletes you are not working with ‘young athletes’… you are working with ‘developing young athletes.’ I can tell you from years of experience, that if you want to burn a kid out and lose them mentally… just send them for jogs all the time.
Another important consideration when training athletes 6-13 is that their overall ability to gain absolute strength is not as much from a killer strength training program as much as from increasing their overall coordination. That’s not to say that strength training programs for youth athletes are completely ineffective. It simply means that incorporating the right kind of strength training program along with efforts to improve overall coordination and gross motor skills will be most-effective.
Youth athletes can best get into condition for sports with game-oriented activities…
The way a young mind works necessitates ‘fun’ activities while conditioning. Here are some ideas of things you can add to practices when working with youth athletes to improve their overall conditioning in a competitive game-like setting:
Relay Races – I don’t think I’ve ever met a youth athlete that didn’t get ‘pumped up’ when they found out that they were going to compete in a relay race. Relay Races that employ different gross motor skills serve the young athlete with multiple benefits:
- They train the anaerobic energy system of the athlete, similar to that required in sports
- They promote teamwork
- They can be used to promote skills without constant ‘drilling’
The key behind effective Relay Races in order to develop young athletes into well- conditioned athletes is to define your goals, and thoroughly explain what you want to see. Let them know that quality comes first and you want to see the skill perfected. Here’s an example:
You can start out with a Ring Relay. Divide your athletes into teams of 4. Have each team of 4 sit one behind the other behind the starting line. The first person in each line will have a rubber ring (or anything that they can run with in their hand). On the command of the ‘whistle’ (I like to use a whistle so that they get used to reacting to that sound since it’s common in athletic competition) the first person runs across the gym to a line on the other side where they drop the ring. They immediately turn and run back to their team and ‘High 5’ the next person in line. The second person immediately runs across the gym where they pick up the ring and immediately run back to their line. When the second person gets back to their line they hand the ring to the next person who proceeds to run the ring across the gym, drop it off on the finish line and run back etc.
The first team to finish is the winner…
The last team to finish is eliminated.
You immediately begin another round with the teams that are still in. This continues until you have 1 team left as your overall winner.
This is a great way to add overall conditioning to your young athletes… I like to do this with different skills too. Use your imagination…
You can do Relay Races with:
- Crab Walks
- Bear Crawls
- Frog Leaps
- Duckwalks
- Spider Crawls
The gross motor patterns that are trained during this activity with enhance the overall progress in your youth athletes in so many ways. If you aren’t using Relays, do so.
Reaction Drills – Having youth athletes work on reaction drills is another very important training consideration when planning practices and training for youth athletes. You can increase the young athletes’ ability to react off the whistle by also having them react to visual cues, as well as different auditory cues.
Visual Cues Training – Although many athletes have to react to the sound of a whistle when in a game, you can increase their reaction time to the auditory stimulus (the whistle) by training their ability to react to visual stimulus.
One way to work on speed of reaction visually is the Ball Drop Drill. In this drill you have 2 partners face off a few feet apart in an athletic stance. One partner holds a tennis ball. The partner with the ball drops the ball, and the other partner must react by catching the ball.
Verbal Reaction Training – Verbal reaction training is another favorite of mine when working with young athletes. In this type of reaction training the athlete begins in an athletic stance. The coach then yells out one of 3 commands,”KNEEL”, “BELLY” or “BACK.” The athlete must either kneel, lie on their belly, or lie on their back as quickly as possible following the command. This reaction training develops the overall speed of a young athlete incredibly well without the need for strength training simply because at this young age their muscles adapt to training with ‘cues’ more than weights.
Sprint Reaction Training – Another great way to build more speed and power from youth athletes is to employ Sprint Reaction Training. You begin by having your athletes lined up next to each other on a line. You have them start in one of the following ways:
- Kneeling
- Lying on stomach with arms stretched overhead
- Lying on back with arms stretched overhead
- Hands and knees
The coach then blows the whistle, and the athletes react by scrambling to their feet as quickly as possible and sprint across the field or gym. This is done rapidly with athletes running back to end of their line to await their next turn.
This type of reaction training helps develop the neuromuscular connection in the Posterior Chain muscle group – Hips, Hamstrings, Lower Back, Glutes and Core. This is the basis for developing incredible strength and coordination for sports speed.
Stretching for Youth Athletes
As I alluded to in the previous section, youth athletes between ages 6 and 13 benefit in their overall strength by improving their gross motor coordination and reaction time. Absolute strength appears to increase more than it actually does (or can) at this level when you increase overall coordination.
Another important thing to note at this level is that Stretching must be age-appropriate.
To begin, there are 3 types of stretching that athletes should be familiar with: Static Flexibility Training, Dynamic Flexibility Training, and Proprioceptive Neuromuscular Facilitation Stretching (PNF Stretching).
Static Flexibility Training – Static Flexibility Training is the type of stretching that is performed by getting into a stretched position and ‘holding the stretch’ for periods of 30 seconds to 60 seconds or more. This type of flexibility training is used at least 2-3 hours before training, after training or before bed. But here’s the important thing:
Static Flexibility Training Should NOT Be Used With Athletes In The 6-13 Age Group!
The youth athlete has delicate connections between the soft tissue (muscles, tendons and ligaments) and bones. Static stretching serves the purpose of permanently increasing the length of short muscles such as with previously injured areas and basic muscle imbalances. Static stretching is contraindicated until the athlete reaches the 14+ age group as with High School athletes.
PNF Flexibility Training – PNF Stretching is a type of stretch where the muscles are taken through periods of repeated relaxation and stretching to achieve an overall increased range of motion in a joint. PNF Stretching is the most effective for permanently lengthening a muscle.
PNF is performed either alone or with a partner. It can be performed before or after exercise, unlike Static Flexibility Stretching. However, PNF Stretching like Static Flexibility Stretching should not be performed by youth athletes.
Dynamic Flexibility Training – Dynamic Flexibility Training is an active type of stretching of the muscles. In this form of stretching, the body is taken through full ranges of motion without holding any positions.
This type of flexibility training serves numerous purposes:
- Raises your body core temperature to loosen up for training, a match or practice
- Increases the viscosity within joints to reduce wear and tear and help prevent unnecessary injury
- Increases muscular strength throughout the full range of motion of a joint
Dynamic Flexibility Training is advocated for Youth athletes both as a warmup for training, practice or matches AND as a cool-down after these events. This type of flexibility training helps a youth athlete prevent injury and ‘safely’ keep a full range of motion in a joint. This sets the stage for more pronounced strength gains once the athlete reaches High School.
The following workout is a thorough Dynamic Warm-up Routine that can be effectively used by athletes of any age. The only difference is that the older athletes in High School is the addition of other stretching protocols.
Dynamic Warmup
This Dynamic Warmup can be used by athletes at all ages and skill levels. It should be performed before any practice, matches, or strength/conditioning training. This program can actually be used with virtually any athletes as it warms up the entire body for athletic endeavors.
Dynamic Warmup
- Perform each exercise with a full range of motion
- No rest in between exercises
- Keep face relaxed and breathe normally during exercise
| Exercise | Reps/Duration |
| Burpees | 20 |
| Jumping Jacks | 20 |
| Monster Walk | 10 per side |
| Side Monster Walk | 10 per side |
| Combat Squats | 10 |
| Shoulder Rotations | 10 each direction |
| Crab Walk with Table Top | 15 steps, table top every 5 steps |
| Hip Extensions | 6 with 2-second hold at top |
| Inchworm | 6 |
| Dynamic Superman | 10 |
| Knee to Armpit | 10 per side |
| Bear Crawls | 10 |
Strength Training for Elementary School Athletes
Finally… we’re at the point of discussing strength training for Elementary School athletes. Before I get into the training programs themselves for the offseason, let’s discuss the needs of a youth athlete and therefore the basis of our training program.
The Principles of Movement – In every aspect of a sports competition you are using your body to the fullest. Virtually all of your muscles are shortening or lengthening with constant contractions. All of your movements your body does stem from one of the basic movement patterns:
- Squat
- Bend
- Lunge
- Twist
- Push
- Pull
- Walking (gait of walking pattern)
Athletes require all of these movement patterns to be optimal in order to perform at their best. Taking it a step further, a young athlete requires training in all 3 planes of motion:
Sagittal Plane – Imagine dividing the body into left and right halves using an imaginary line. This gives you the Sagittal Plane. Any forward and backward movement parallel to this line occurs in the Sagittal Plane. Exercises such as Squats, Bench Presses and Deadlifts work the body in the Sagittal Plane of motion.
Frontal Plane – With the same imaginary line, now divide the body into front and back halves to get the Frontal Plane. Any lateral (or side to side) movement parallel to this line will occur in the frontal plane. Exercises such as Side Planks, Abduction and Adduction of the hips, and Lateral Raises work the body in the Frontal Plane of motion.
Transverse Plane – Now, if you will imagine a plane dividing the body into top and bottom halves, you will have the Transverse Plane. Any movement that is parallel to the waistline or across the body occurs on the transverse plane. Exercises such as Wood Chops or Cross Body Cable Pulls are heavily involving the core… specifically the Transverse Abdominus Muscle area. This, my friend, is the key to developing total sports speed and power. This plane of motion is often neglected in traditional athlete training programs.
Core Stability – The core is the cornerstone of a athlete’s strength. Every time you do anything athletic. you require core stability. This is your body’s ability to keep a good posture for sports skills.
To increase core stability in youth athletes it is imperative to include Planks and variations of Planks in a strength training program. This is especially true with Youth athlete because the core tends to be weaker with the younger athletes. Not only is this going to hurt their sports performance but they are much more susceptible to injuries throughout their careers, especially in the back and hips.
Unilateral Movement – Often in a sports event the athlete has to pivot off of one foot at a time. Because of this we incorporate a good amount of unilateral strength training in the programs of younger athletes. Unilateral Training is when you perform exercise with only one side of your body at at time. For a young athlete, this means:
- Developing a Full Range of Motion On Both Sides of the Body Equally, Which Means More Power and Less Injuries
- Increased Strength Development Due to More Increased Muscle Fiber Recruitment
- Faster Strength Gains In Muscle
It’s pretty interesting to note that when you perform an exercise with one arm or leg at a time, you will notice immediate strength gains per half of your body. I’ve used unilateral training extensively with all ages of athletes. But we do them differently, depending on the ages of the athletes we’re working with.
I really like to use bodyweight and dumbbells when training younger athletes. They allow for proper education on range of motion for ultimate strength gains for the mat. With just bodyweight and simple tools such as dumbbells, you can use unilateral training with your youth athletes that will do more for their stage of development than just about anything else out there.
Some great examples of unilateral exercises that best benefit youth athletes are:
- 1 Leg Romanian Deadlift
- 1 Leg Squat
- 1 Arm DB Bench Press
- 1 Arm DB Shoulder Press
- 1 Arm Lateral Raise
- 1 Arm Row
- 1 Leg Cross Foot Touch Squat
- 1 Leg Heel Touch
- 1 Arm Pulldown
Posterior Chain Development – The posterior chain muscle group, as mentioned before, is a group of muscle working together. At the youth level, we’re trying to build a coordinated effort amongst the muscle groups that make up the posterior chain. This helps us build strength while we build coordination in the same area that we work in High School. The difference is that in High School we move into exercises that allow the athlete to increase the workload on the posterior chain muscles. The posterior chain muscles will get sufficient stimulus from many of the unilateral exercises that will be in the program.
Dynamic Warmup Exercises
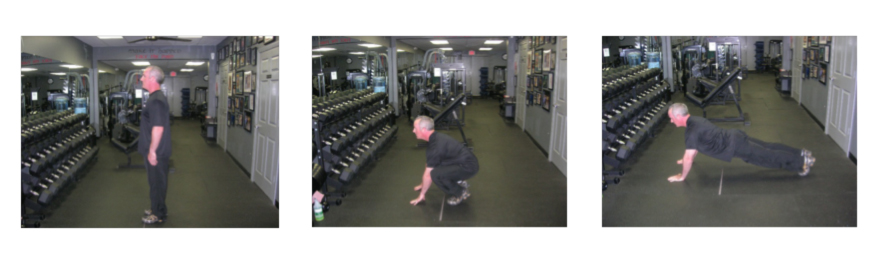
Burpees
- Begin in standing position
- Squat down and place hands on floor in front of you
- Extend legs straight back – pushup position
- Jump back into squat position
Jumping Jacks
- Begin in standing position with legs together and hands at your side
- In one motion, jump up and straddle legs as arms reach over head and hands touch
- Continue in rapid fashion

Monster Walk
- Begin in standing position with hands on hips
- Lunge out to front with as large of a step as possible without twisting hips
- Immediately lunge forward with opposite leg
- Continue with big lunges without rest

Side Monster Walk
- • Begin in standing position with hands on hips
- • Lunge out to side as far as possible
- • Return to standing position, then repeat

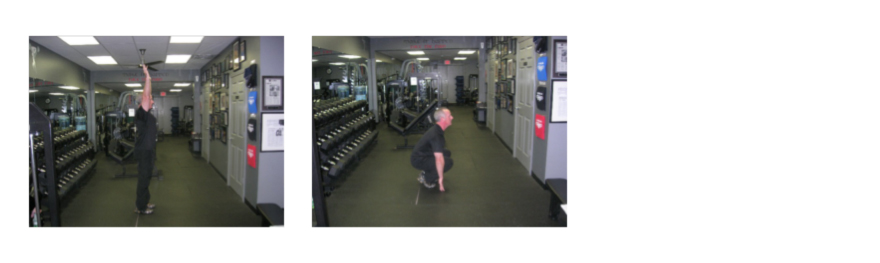
Combat Squats
- Begin in standing position with hands over head
- Crouch down rising up on balls of feet and touch ground
- Rise to standing position with hands over head
- Repeat

Shoulder Rotations
- Begin in standing position with arms held straight out to sides
- Perform a circular motion with arms, moving from the shoulder
- Do 10 motions in the forward directions
- Repeat in reverse direction

Crab Walk With Table Top
- Begin with feet and hands on floor with bottom raised off floor
- Walk 5 steps with hands and feet
- Raise hips up until they are parallel with the floor and pause for 2 seconds
- Allow hips to drop down and move 5 more steps
- Repeat
Hip Extensions
- Begin lying on back with knees bent and arms outstretched on floor
- Raise hips off floor until the glutes are flexed
- Pause in top position for 2 seconds
- Repeat

Inchworm
- Begin in pushup position with hands placed out in front of head
- Keep legs and arms straight as you begin to walk your feet towards your hands
- Reach a pike position, then walk hands out in front of head to original position
- Repeat
Dynamic Superman
- Lie on floor on stomach with arms and legs outstretched
- Simultaneously raise arms and legs from floor while trying to keep them straight
- Pause in top position, then relax for 2 seconds
- Repeat
Knee To Armpit
- Begin on hands and knees
- Raise right arm and left leg out straight
- Bring left leg in towards right armpit while driving right elbow in towards left knee
- Repeat for desired repetitions on same side
- Repeat with opposite arm and leg
Bear Crawls
- Begin on hands and feet
- Walk forward on hands and feet
- Repeat in backwards and sideways directions if desired
Week 1-4 Workouts
WEEK 1-4: Workout A
| Exercise | Repetitions |
| Pushups with feet on bench | 10 – 30 reps |
| Heel Touch Single Leg Squats * | 10 – 30 reps |
| 1 Leg Stiff Leg Deadlift | 12 each side |
| Prone Cobra | 60 seconds |
| Alternating Arm/Leg Raise | 8 per side |
| Plank | Up to 60 seconds |
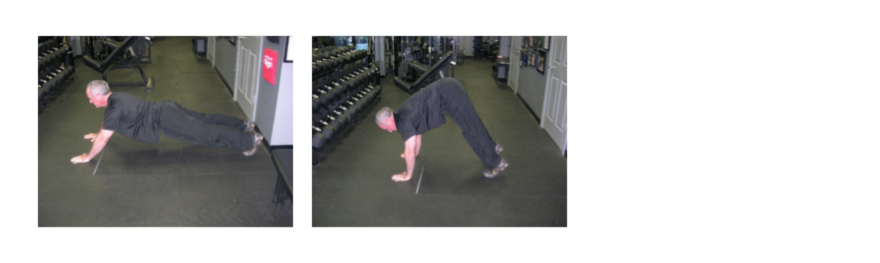
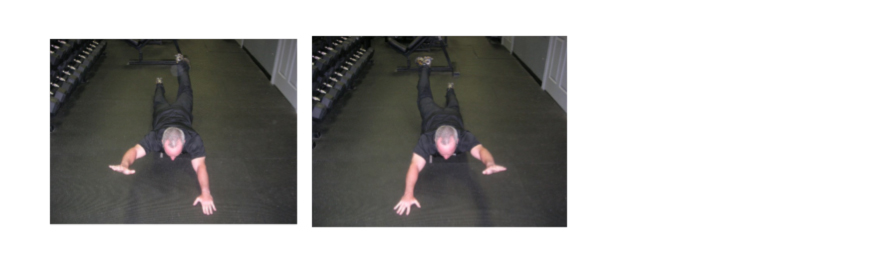
Perform one set for each leg squatting down and touching the outside of the foot that’s on the same side as your hand. Perform a second set for each leg where you reach across the front of the opposite foot to touch the outside of the opposite foot in the squat position. (see photos below)
Go through entire workout, rest 2 minutes then repeat.
WEEK 1-4: Workout B
| Exercise | Reps/Duration |
| Combat Squats | 10 – 30 reps |
| Back Extensions | 10 – 15 reps |
| Side Planks | 10 – 15 reps per side |
| 1 Leg Hip Extensions | 8 per side, hold each rep for 3 seconds |
| External Rotation with Band | 12 – 15 reps per side |
| Lower Abs Pull | 10 – 12 reps |
Perform each exercise with minimal rest in between exercises. Rest 2 minutes after circuit, then repeat.
Go through entire workout. Rest 2 minutes, then repeat.
Week 5-8 Workouts
WEEK 5-8: Workout A
| Exercise | Reps | Rest | Sets |
| Jumping Squats | 3 | 45 sec | 8 |
| Bench Dips | Max reps | 60 sec | 3 |
| Bulgarian Split Squat | 8 each side | 90 sec | 3 |
| 1 Arm SB Chest Press | 8 each side | 60 sec | 3 |
| Renegade Rows | 8 each side | 60 sec | 3 |
| SB Knee Tuck | 10 – 12 | 30 sec | 3 |
| Cross Knee Crunches | 10 – 12 | 30 sec | 3 |
WEEK 5-8: Workout B
| Exercise | Reps | Rest | Sets |
| Plyo Pushups from floor | 3 | 45 sec | 8 |
| DB Sumo Deadlifts | 10 | 60 sec | 3 |
| Seated Dumbbell SB Shoulder Press | 10 | 60 sec | 3 |
| SB Leg Curl | 8 – 10 | 30 sec | 3 |
| 1 Arm DB Bent Row | 10 each side | 60 sec | 3 |
| Stability Ball Exchange | 10 | 30 sec | 3 |
| Plate Truck Driver | 8 | 60 sec | 2 |
Training Exercises
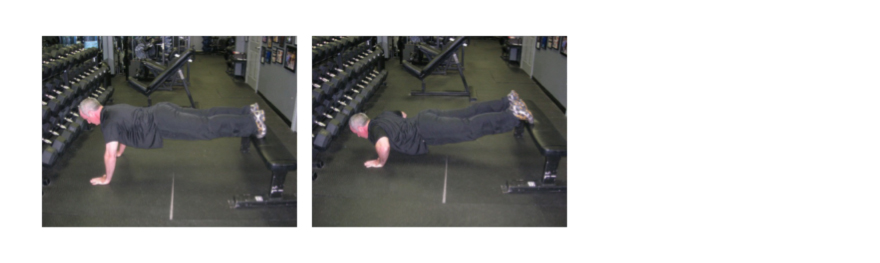
Pushups With Feet On Bench
- Begin in a pushup position with feet on bench keeping back flat
- Lower by bending arms until your chest is 2 inches from floor
- Press back up to starting position
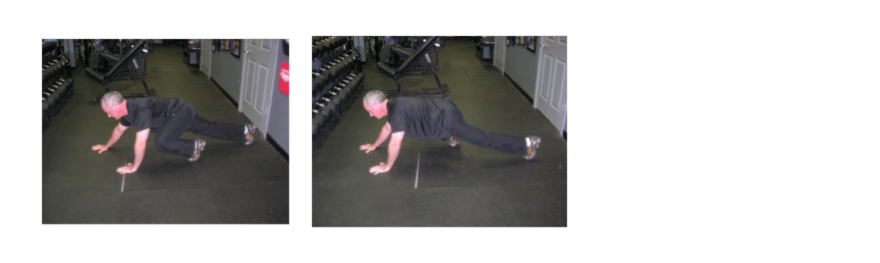
Heel Touch Single Leg Squats
- Stand on one leg with arms at your sides
- Squat down and reach hand to touch outside of foot on squatting leg
- Repeat for desired repetitions
- Repeat on opposite side

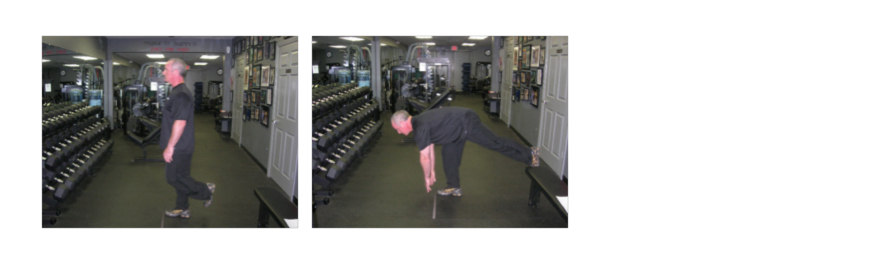
One Leg Stiff Leg Deadlift
- Stand on one leg with arms hanging down in front of your body
- Keeping a slight bend in knee, reach both hands in front of foot
- Repeat for desired repetitions
- Repeat on opposite side
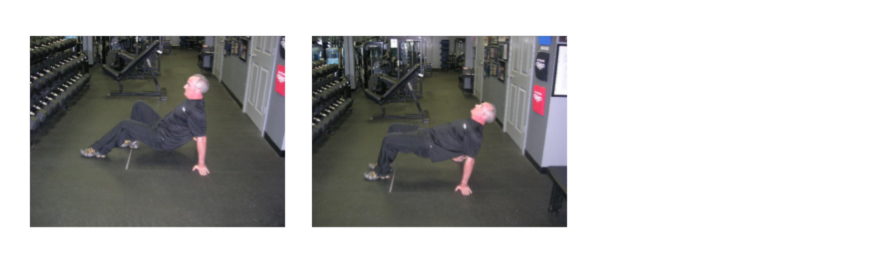
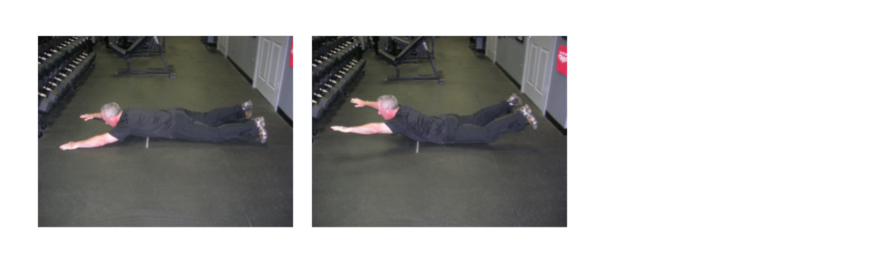
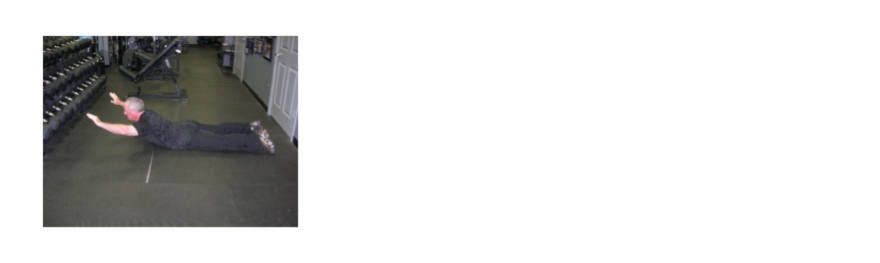
Prone Cobra
- Lie on floor with arms and legs outstretched
- Raise only the torso and arms as high as possible and pause for 1-2 seconds
- Lower and repeat
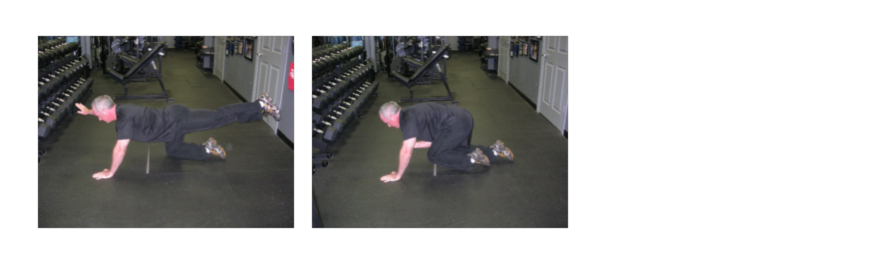
Alternating Arm/Leg Raise
- Lie face down on floor with arms and legs outstretched
- Raise right arm and left leg simultaneously
- Repeat with left arm and right leg
- Keep alternating for desired repetitions
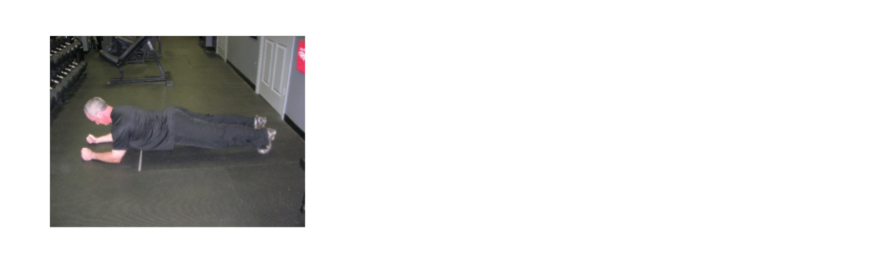
Plank
- Position yourself on forearms and feet with back straight
- Try to pull your navel in towards your spine
- Hold for desired time
Combat Squats
- Begin in standing position with hands over head
- Crouch down rising up on balls of feet and touch ground
- Rise to standing position with hands over head
- Repeat